 Save
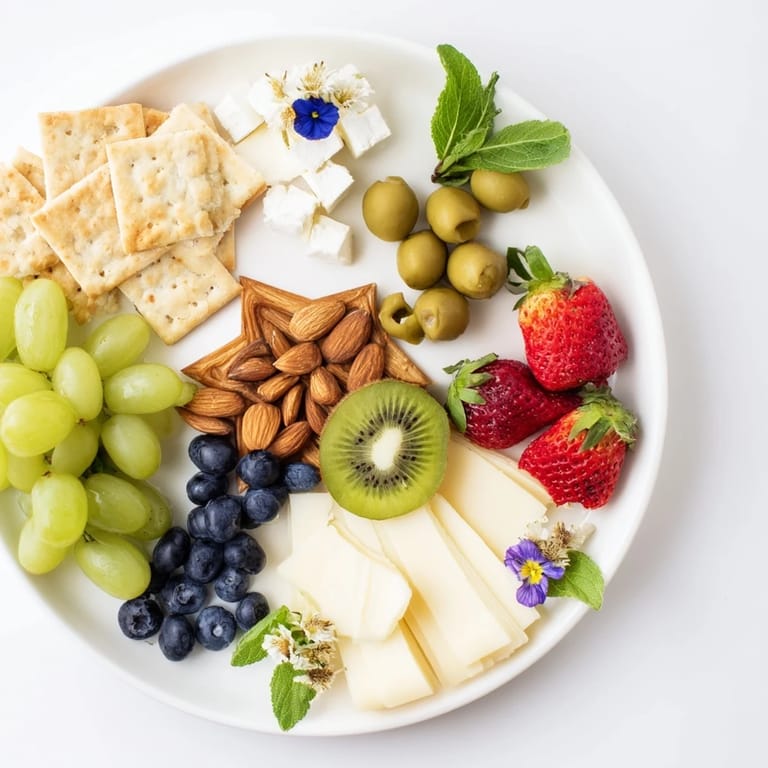
Save I still remember the moment I realized that negative space could be as delicious as the food itself. I was browsing through design magazines late one night, admiring minimalist art, when it struck me: why not bring that same principle to the table? The next evening, I arranged my favorite cheeses, fruits, and nuts on a board, carefully leaving empty space in the shape of a star. When my partner walked in and gasped at the unexpected artistry, I knew I'd discovered something special. That night, our simple appetizer became a conversation starter that lingered long after the food was gone.
I'll never forget hosting my sister's birthday dinner where I created a platter shaped like a giant "M" for her name. As she walked into the dining room, the way her eyes lit up—that moment of pure joy before a single bite—reminded me that food is really about love and attention to detail. She told me later that it was the most thoughtful thing anyone had ever done for her at a table.
Ingredients
- Brie cheese, sliced (100 g): The creamy, buttery foundation that anchors your platter. Slice it thin enough to drape elegantly, thick enough to hold its shape. Room temperature makes it taste its absolute best.
- Manchego cheese, sliced (100 g): This Spanish beauty brings nutty depth and a golden hue that photographs beautifully. Its firm texture means it won't crumble when you're carefully positioning it around your negative space.
- Goat cheese, crumbled (100 g): The tangy contrast that catches guests by surprise. Crumble it into small, uniform pieces so it creates visual texture without dominating the design.
- Seedless red grapes (1 cup): Nature's perfect round jewels. They nestle into gaps beautifully and add pops of glossy color that make the whole composition sing.
- Strawberries, halved (1 cup): Fresh, vibrant, and their natural shape complements geometric designs. Choose ones that are ripe but still firm so they hold together during arrangement.
- Kiwi, sliced (1): Those bright green slices with their tiny seeds create visual interest and act as excellent color blocks to define your negative space edges.
- Blueberries (1/2 cup): These tiny orbs are your detail work—use them to add delicate touches and fill awkward corners where nothing else fits quite right.
- Thin crackers (12): Choose ones with subtle flavor and neutral color so they don't fight with your composition. Their rectangular shapes are actually perfect for creating straight lines in your design.
- Roasted almonds (1/2 cup): Toasted nuts add earthy warmth and textural contrast. Their irregular shapes break up the smooth elements and add sophistication.
- Green olives, pitted (1/4 cup): These briny, dark gems provide contrast and visual grounding. Pit them yourself for the freshest flavor and to avoid surprise pits for your guests.
- Fresh mint leaves: The final flourish that says someone cared enough to think about freshness and presentation. Scatter these last, right before serving.
- Edible flowers (optional): These are your signature touch—they transform a beautiful platter into something that feels genuinely special and unexpected.
Tired of Takeout? 🥡
Get 10 meals you can make faster than delivery arrives. Seriously.
One email. No spam. Unsubscribe anytime.
Instructions
- Design Your Vision:
- Grab a piece of parchment paper and sketch out your negative space design with a pencil. A star, someone's initials, a heart, a crescent moon—whatever speaks to you. Make sure it fits your platter and that the empty space is bold enough to be clearly visible once you've surrounded it with food. This is your roadmap, so take a moment to really think about what shape will make people smile.
- Set Your Guide:
- Lay the parchment with your sketch directly on your platter. This becomes your template. The pencil marks will guide where everything goes, and you'll remove this paper at the very end to reveal the magical negative space underneath.
- Anchor with Cheese:
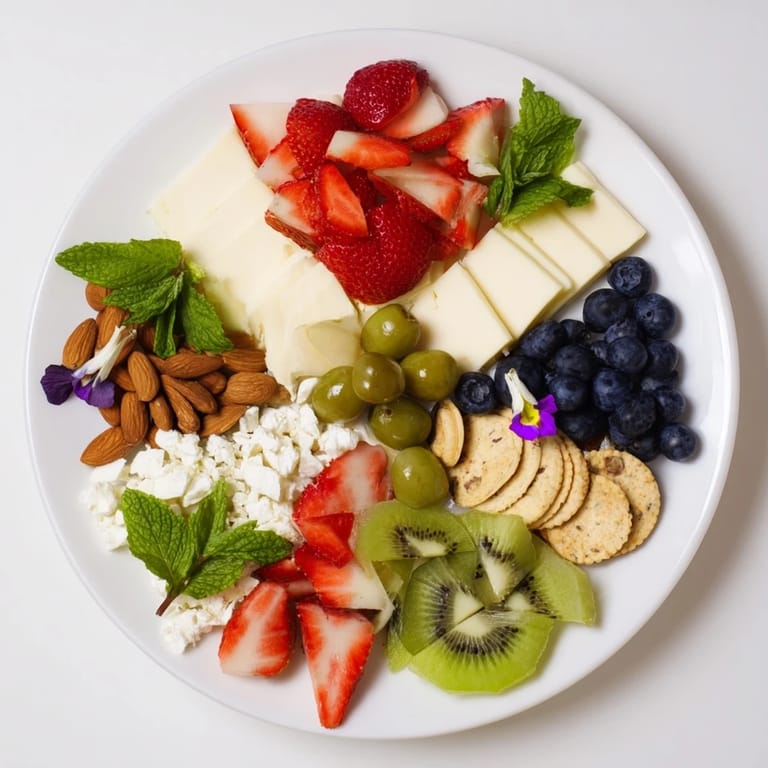
- Start by clustering your cheeses around the edges of your negative space, leaving that empty area completely clear. Arrange them in small groupings—don't scatter them randomly. This is your foundation, and it should look intentional. The cheeses are your heavier anchors that define the outer boundary of your design.
- Build with Fruits:
- Now comes the meditative part. Fill the remaining spaces with fruit, but be strategic. Alternate colors and shapes as you go. Place strawberry halves face-up for drama, nestle grapes into gaps, arrange kiwi slices in overlapping patterns. As you work, step back frequently and squint at the platter—this helps you see if the composition is balanced or if one section needs more visual weight.
- Add Texture and Interest:
- Scatter your almonds and olives in small piles throughout. These aren't random—they're the final layer that gives everything dimension. They should feel like punctuation marks in your edible composition, adding visual rhythm without overwhelming the design.
- The Reveal Moment:
- This is the magic. Carefully lift away the parchment paper, and there it is—your negative space, clean and crisp and absolutely stunning. Take a breath. You've just created something genuinely artistic. Any final gaps can be filled with a few more berries or a scatter of mint.
- The Finishing Touch:
- Sprinkle fresh mint leaves across the platter with abandon—they should look natural and fresh, not placed with tweezers. If you're using edible flowers, now's the moment to add them. Step back and admire your work because you absolutely deserve to.
- The Grand Unveiling:
- Serve immediately while everything is at peak freshness. Encourage your guests to actually look at the platter before diving in. Point out the negative space. Tell them the shape. Let them have that moment of appreciation before it all gets deliciously devoured.
 Save
Save There was one evening when a guest at my table—someone I'd known for years—looked at the platter I'd spent forty minutes creating and said, "You made this just for us." It wasn't about the ingredients being expensive or fancy. It was that visible effort, that intentional care carved right into the empty space. That's when I understood that cooking isn't just about feeding people—it's about making them feel seen.
Playing with Shapes and Meanings
The beauty of negative space is that it transforms a simple platter into storytelling. I've created a star for celebrations, a heart for anniversaries, and once, I spelled out someone's initials just because they'd done something kind and I wanted them to know I noticed. You could make a crescent for a dinner party, a geometric pattern for a modern aesthetic, or even attempt a tiny portrait if you're feeling adventurous. The shape becomes the conversation—guests will spend more time talking about what they see than they ever would with a traditional spread. It's food as art, and that's where the real magic lives.
Adapting for Different Occasions
This platter shifts beautifully depending on what you're celebrating. For a dessert version, swap the cheeses for dark chocolate shards, add biscotti, dried apricots, and candied orange peel. For a holiday gathering, use cranberries and pomegranate seeds instead of some of the berries. For a elegant dinner, focus on just three cheeses and pristine fruits. The negative space principle works whether you're creating an appetizer for a casual gathering or a show-stopping dessert board for something more formal. The technique remains the same—only the ingredients change.
The Secret to Stunning Presentation
I've learned that the most stunning boards aren't about having rare or expensive ingredients—they're about arrangement and intention. Balance color, texture, and shape. Group similar items but vary heights and sizes. Use odd numbers when clustering items because three almonds look more intentional than four. Most importantly, let that negative space breathe. It's just as important as everything you place. This is your moment to prove that thoughtfulness and creativity matter as much as technique in the kitchen.
- Arrange ingredients in advance if you're serving later, but keep fruits covered and chilled until the last possible moment before serving to maintain freshness
- If you're creating this for a special person, consider incorporating their favorite flavors or colors into your ingredient choices
- Take a photo before guests start eating—you'll want to remember the moment when all that care and intention was still perfectly intact
 Save
Save Creating a negative space platter changed how I think about cooking. It reminded me that sometimes the most impressive dishes aren't complicated—they just require seeing what you have in a new way. Every time I place that parchment and sketch a shape, I'm not just making food, I'm creating a moment someone will remember.
Recipe FAQ Section
- → What is the best way to create negative space on the platter?
Sketch your desired shape lightly on parchment paper placed over the serving board. Arrange ingredients around it, leaving the shape clear and defined.
- → Can I substitute ingredients for dietary needs?
Yes, use gluten-free crackers for gluten intolerance or swap cheeses for dairy-free alternatives to accommodate various diets.
- → How do I keep fruits fresh on the platter?
Select firm, ripe fruits and prepare them just before serving. Keep berries dry and chill the platter if not serving immediately.
- → What garnishes enhance the visual appeal?
Fresh mint leaves and edible flowers add vibrant color and freshness, complementing the arrangement beautifully.
- → Is this platter suitable for dessert variations?
Yes, replace cheeses and crackers with chocolates, biscotti, and dried fruits to create a sweet-themed negative space presentation.