Save
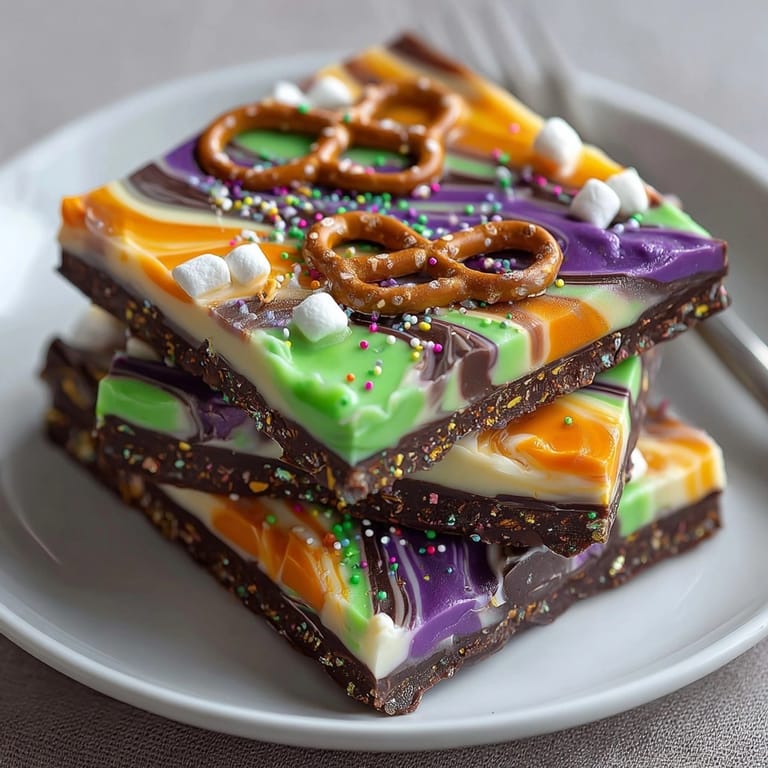
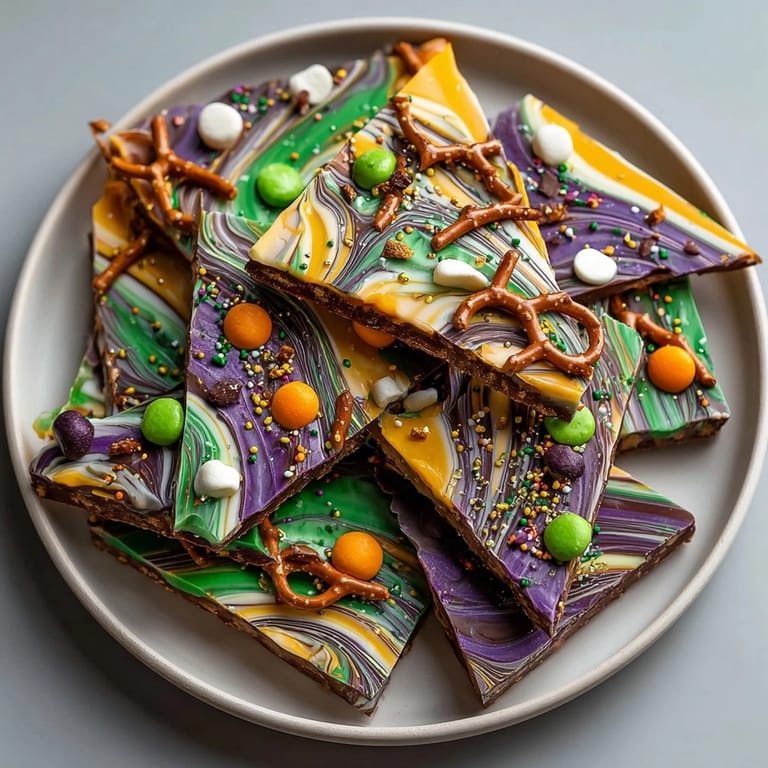
Save This enchanting Melted Witch Chocolate Bark is my go to treat for Halloween or anytime I want to bring a touch of magic to the dessert table. Swirly chocolates and playful toppings create a fun candy that looks impressive but comes together in minutes. Kids and adults both love breaking off a piece and discovering the witchy surprises inside.
My first batch disappeared in minutes at our block party and now my niece insists this bark is her new Halloween tradition
Ingredients
- Dark chocolate: creates a rich, sturdy base and holds up well to toppings Look for glossy, snappy bars without bloom for best results
- White chocolate: adds visual drama and creamy flavor Choose a bar or chips with real cocoa butter for best melting
- Green candy melts: give witchy color and are easy to work with Pick a fresh pack that feels soft not dried out
- Purple and orange candy melts: add magical streaks and Halloween vibes
- Mini pretzel sticks: transform into edible broomsticks and witchy legs Make sure they are crisp and unbroken
- Green gummy candies: mimic the classic pointed witch shoes and add chewy contrast
- Halloween sprinkles: provide sparkle and fun shapes Pick a mix with orange, green, purple and black for best effect
- Edible glitter or sanding sugar (optional): makes the bark shimmer Choose fine crystals for better stick
- Mini marshmallows (optional): add softness and whimsical texture Fresh is best here so the marshmallows stick
Tired of Takeout? 🥡
Get 10 meals you can make faster than delivery arrives. Seriously.
One email. No spam. Unsubscribe anytime.
Instructions
- Prep the Sheet:
- Line a baking sheet fully with parchment This keeps the bark easy to remove and break later
- Melt the Chocolates:
- Place dark and white chocolate in separate microwave safe bowls Heat each in short bursts of 30 seconds stirring well after each until silky and lump free Watch closely to avoid scorching
- Melt Candy Melts:
- Use separate small bowls for each candy melt color Microwave as the package directs typically in 20 second intervals stirring until smooth
- Spread the Base:
- Pour melted dark chocolate onto your lined baking sheet Use a spatula to spread it evenly into a rectangle about 8 inches by 10 inches for thick even bark
- Marble the Chocolates:
- Drizzle melted white chocolate over dark chocolate Using a toothpick or skewer gently swirl in looping motions to make a marbled design Try not to over mix to preserve the swirls
- Add Witchy Colors:
- Drizzle melted green purple and orange candy melts across the chocolate Use random zigzags or swirls to create spellbinding streaks
- Decorate with Witch Parts:
- While chocolate is still melted start arranging pairs of pretzel sticks side by side as witch legs Place a green gummy at each end for shoes Poke gently to secure
- Finish with Toppings:
- Scatter Halloween sprinkles edible glitter and mini marshmallows over the bark Press lightly so everything sticks
- Set and Finish:
- Leave the bark at room temperature or refrigerate about 30 minutes until totally hardened Lift from the sheet and break into rough pieces
- Serve and Enjoy:
- Pile pieces on a festive platter or pack up in treat bags for a spooky surprise
 Save
Save Every year the green gummies are my favorite part My cousin Lily tried making this with sour strips for witch hair and everyone laughed at the weird shaped witches but they tasted fantastic Making this bark always means messy hands and creative decorations all over the table
Storage Tips
Keep the bark in a lidded container at cool room temperature for up to one week If your house is warm pop it in the fridge wrapped in parchment to prevent condensation The bark holds up even longer when frozen Just separate layers with parchment so nothing sticks
Ingredient Swaps
Feel free to switch in peanut butter chips or butterscotch for a new flavor Try sour gummies for extra kick Gluten free pretzels work well too If you lack candy melts use extra white chocolate tinted with gel coloring
Serving Magic
Break bark into big chunks for a show stopping treat platter Layer in cellophane bags and tie with ribbon for edible Halloween favors Arrange on cupcakes as edible toppers Wilton witch hats or candy eyeballs add extra fun
Halloween History
Witch themed treats go back decades and chocolate bark is a US party favorite The bark name comes from its tree bark look Halloween candies in America mix playful spookiness and bright colors to amp up fun
Adapting for Seasons
Switch the sprinkles and candy melt colors for Christmas with reds and greens For spring use pastel melts Add dried berries or nuts when not making for children
 Save
Save Let kids help with sprinkling and decorating for extra joy This magical treat brings pure festive fun to every table
Recipe FAQ Section
- → How do you achieve the marbled effect?
Swirl dark and white chocolate together using a toothpick or skewer for a vibrant marbled look.
- → Can I use other candies for decoration?
Yes, customize with your favorite candies, colors, or themed sprinkles for personal flair.
- → How long does the bark need to set?
Let the chocolate set at room temperature or refrigerate for about 30 minutes until completely hard.
- → Is it suitable for children to help make?
Absolutely! Kids can drizzle melts, arrange decorations, and break bark into pieces once set.
- → How should the bark be stored?
Keep pieces in an airtight container at cool room temperature for up to 1 week.
- → What allergens are present?
Contains milk, soy, gluten, and may contain traces of nuts; check all ingredient labels for safety.